Facebook and Instagram ads can be a confusing and time-consuming process if you haven’t yet set up a Meta Business Manager account.
The Influence Agency specializes in helping new and emerging businesses launch their Facebook and Instagram paid campaigns. From account set-up to content creation to campaign launch and optimization, our team has managed campaigns big and small across a wide range of markets.
Setting up your Meta Business Manager correctly can save you tons of time later on and also result in more successful social media marketing campaigns. That's why we’ve put together this Ultimate Meta Business Manager Checklist for Beginners to get you ready to launch your first campaign.
What is Meta Business Manager
First, the obvious question: what is Meta Business Manager?
Meta Business Manager is Meta's one-stop platform for managing all things related to your online business. The platform gives you access to manage Facebook and Instagram pages, Meta pixels, Meta ad accounts and campaigns plus more.
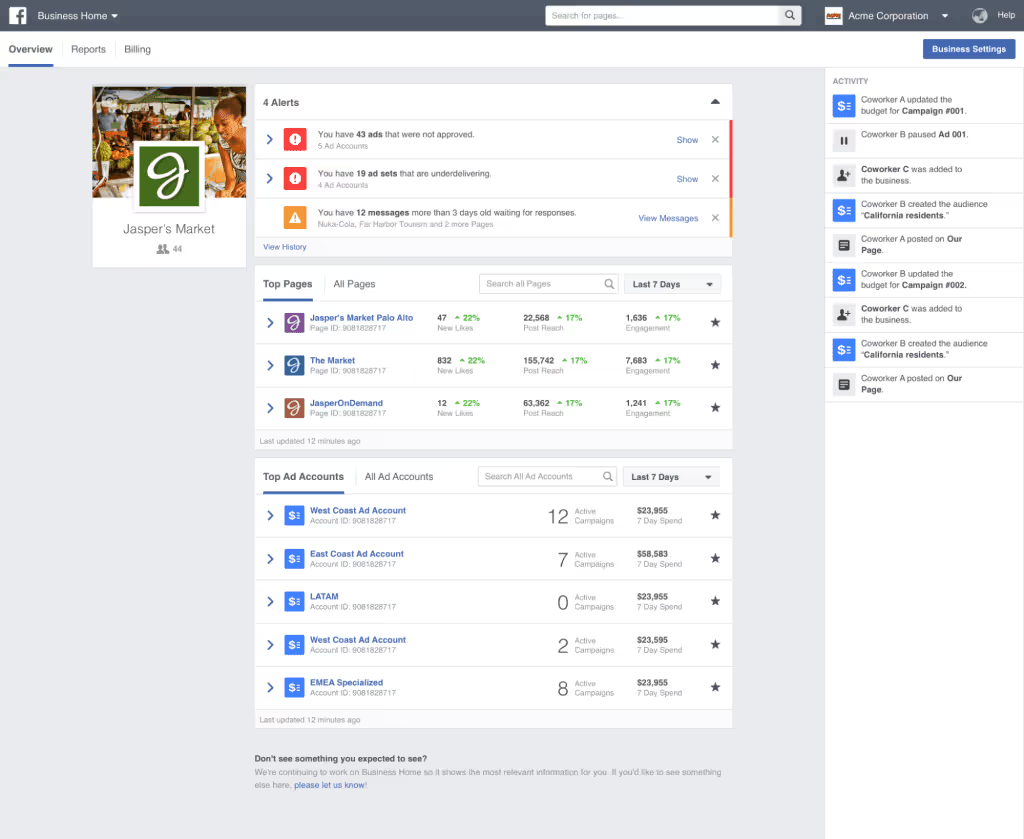
The main benefit of Business Manager is that you can assign various employees, agencies or even other businesses to manage different aspects of your Meta components. In the past, assigning permissions to employees or third parties was a complicated and frustrating process. Now, with a couple of clicks, you get everyone the access they need rather quickly.
NOTE: In this article, we use both terms Meta and Facebook. Meta refers to the parent company (and in this case, the Business Manager), Facebook is the social media platform specifically. The Business Manager was previously called “Facebook Business Manager” but was changed to “Meta Business Manager” following the company’s rebrand in 2021.
How to Get Your Meta Business Manager Ready for Ad Campaigns
Picking A Primary Admin
The very first thing you need to do is to determine who will be the Business Admin for the account. Business Admins will have permission to assign, add, and remove people to/from the account, create new pages, and make changes to billing, amongst many other things.
If this is something you will manage then move on to the next step, if it’s someone other than yourself, it's best they carry out the next steps.
NOTE: Whoever creates the account will be the owner ad infinitum, and can't be removed. Do not get an employee to set this up if you aren’t sure how long they will stick around for.
Creating Your Account
Now that you’ve picked your primary admin, now it’s time to get started setting things up.
Head over to the Business Manager page, and get started by clicking “Create Account”. Even if you already have a Facebook Account, avoid the temptation of clicking “Sign In”. You’ll need to connect your personal Facebook account later on, but for now, we need to start fresh.
After that, you’ll be prompted to provide some personal and some business information. Once that’s been submitted, you should be directed to the back end.
Before you move on, check your email for any verification requests from Meta. Follow any necessary steps and head back into Meta Business Manager.
Connect your Assets
Now that your account is set up, it’s time to connect your various assets, including Facebook Pages, Instagram accounts, or apps.
Find the little gear icon on the left-hand side of the screen, click that and navigate to ‘Business Settings’.
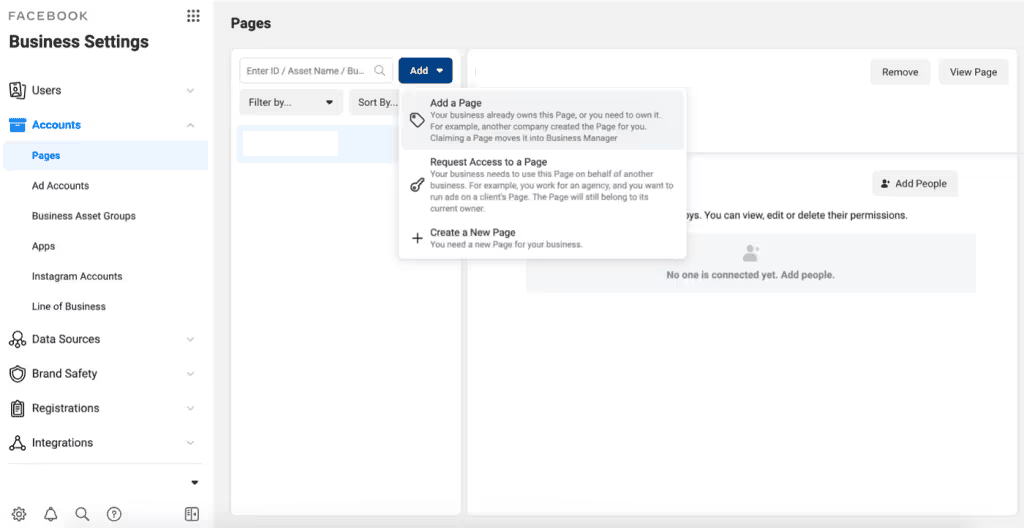
Before you add any existing accounts, you’ll need to make sure that they are connected to your personal Facebook account. If you have multiple Instagram accounts, you may need to log in and out of them as you add them through Business Manager. Navigate over to ‘Accounts’ in Business Settings and Click ‘Pages’ (in Business Suite this will be under ‘Business Assets’).
Connecting A Facebook Page
Click the ‘Add Assets” button. One by one you’ll want to add the appropriate Facebook Pages and Instagram accounts. If you have any ad accounts then now is a good time to add them as well (if you don’t, skip this as we’ll get into this a bit later).
Creating A Facebook Page
If you don’t have a Facebook Page, you can actually create one right in Business Manager. Simply click “Add” and select “Create New Page”. You’ll be directed to Facebook.com to continue setting up your new Facebook Page.
Requesting Access to an Existing Facebook Page
If your Facebook Pages are already connected to another Business Manager, you’ll need to request access to it by clicking “Add” and “Request access to a page,” and entering the Facebook page name or URL. If the Business Manager it’s connected to is managed by another business, you might want to contact their administrator so they see the request.
Connecting An Instagram Page
To add an Instagram account, simply click on the ‘Add’ button in the corresponding tab. You’ll be redirected to an Instagram login page. Make sure that you’re logged into the Instagram account already before you do this, otherwise, you’ll end up connecting your personal account or whoever’s last logged in to their account on your browser.
Preparing Your Ad Account
If you’ve gotten this far, the good news is that you’re past what can be the most frustrating point. Take another moment to congratulate yourself, you’re a star! Now onto the next step: Ad Account up and running.
So what is a Facebook Ad Account?
A Facebook Ad account is what allows you to pay for ads. It’s fairly simple to set up, but crucial to have for running ads.
Adding a Payment Method
Get Started: Before we create an ad account, the first step is to add a payment method. On the left-hand side, find the tab that says ‘Payment Methods’. Once you’re in there you can click to add a payment method.
necessary information. Please pay close attention to the Currency selector and choose the one that relates to your banking details. For example, if you live in Canada with a Canadian bank account be sure you used CAD.
Creating an Ad Account
While still in ‘Business Settings’, scroll back up to ‘Accounts’ or ‘Business Assets’ (depends on if you’re running Suite or Manager) click on ‘Ad Accounts’.
Similar to Facebook Pages, you have three options: create a new ad account, connect an existing one or request access to one. For the sake of this article, we’re going to focus on the first options.
Go ahead and click ‘Add’ and select ‘Create New Ad Account’. Once you do that, you’ll be prompted to fill out some information.

Naming Your Ad Account
Under ‘Ad Account Name’ choose something that is related to the specific business you intend on running ads for. If you plan on using this ad account to run campaigns for several different pages/accounts then name it something that relates to the overall business.
Business Settings
Choose the correct Time Zone and Currency (make sure the currency matches your payment method). After you’ve followed these steps you’re all done!
Set up and Connect a Meta Pixel
Depending on your technical proficiency and capabilities you may want to skip this next step, but we highly recommend you complete this section!
If you have a website or e-commerce page such as a Shopify or WooCommerce page, the next thing to do is to make sure that we connect it to Meta Business Manager by installing a Meta Pixel and Verifying your Domain.
Creating a Meta Pixel
What is a Meta Pixel?
A Meta Pixel (formerly called the Facebook Pixel) is a piece of code that gets installed on your site that allows your website “speak to” Meta. It does this by sharing data between the two, which helps achieve more precise targeting. The end result is better conversion tracking and makes it easier to optimize ads.
Get Started: Navigate over to ‘Data Sources’ and select ‘Pixel’. Similar to previous steps, you’ll be prompted to create a new Pixel. Follow the instructions by giving it a name and entering the full URL to your website and hit continue.
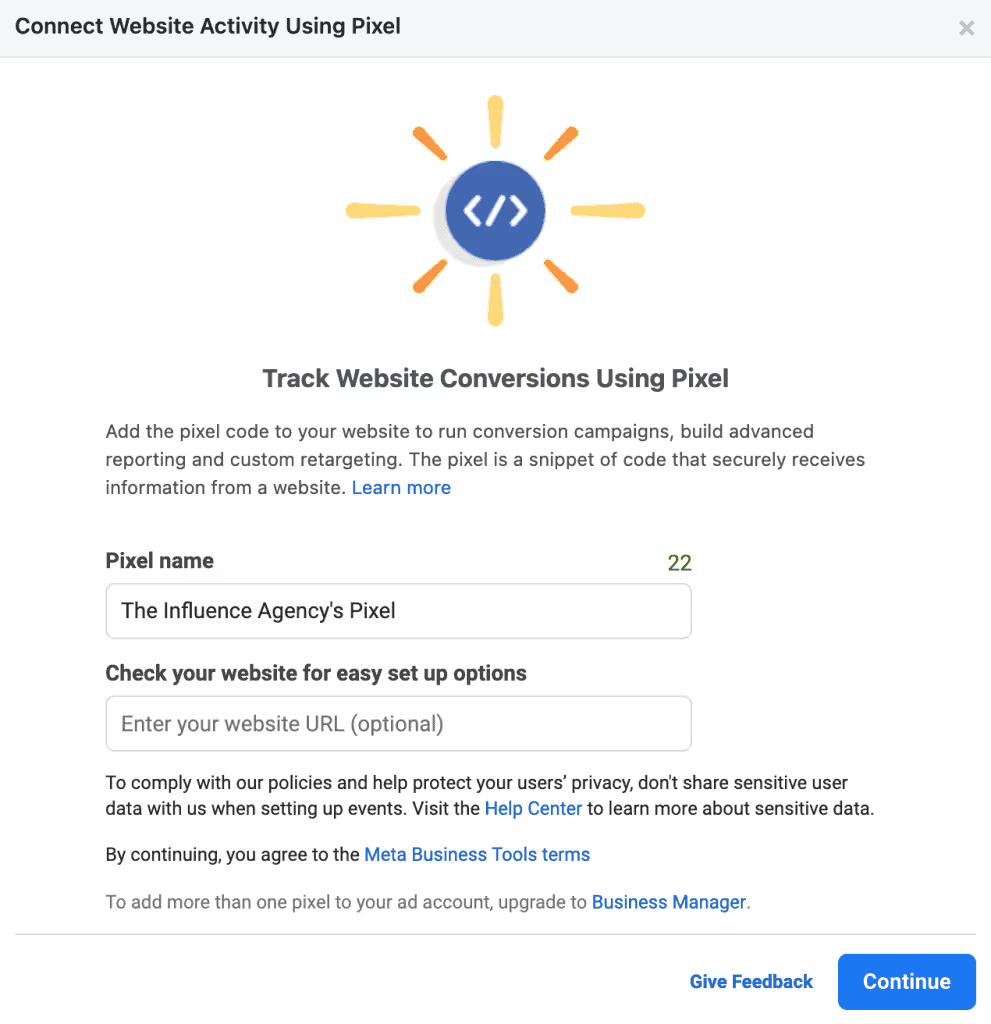
You may be prompted to select additional parameters, such as choosing between Conversions API and Meta Pixel. Choose the latter and continue.
Pro-tip: use a similar naming convention to your Ad Account, you’ll thank us later.
From there, you have two options of how to install the code: Install the code manually or use a partner.
- If you’re using a partner integration such as WordPress or Shopify select this option and follow the instructions.
- If your website is custom-built, you’ll have to have the code installed manually. If you know how to do this yourself then follow the instructions, otherwise, you’ll need to contact your website developer to finish the job.
For those who aren’t the most technologically inclined, setting up a Meta Pixel can be a bit overwhelming. However, if you are able to do it your future ad campaigns will benefit greatly!
Adding People, Agencies and Partners
The last step in this whole journey is to give your social media marketing team access to the Business Manager! If you’re just starting a social marketing program with The Influence Agency we’ll help you with the step, but if you’re working with an internal team this section was written for you.
In ‘Business Settings’ click the ‘Users’ tab and select ‘People’ and click ‘Add’.
On this screen, you’ll be prompted to enter the person's email address. You can also add a bunch of people at once, which is helpful if you have a team you’re working with.
You’ll have the option of giving them Employee access or Admin access. Employees have less overall control over the account, whereas Admins can effectively make account-level changes to the Business Manager. Additionally, you can assign different roles like Finance analyst under ‘Advanced Options’.
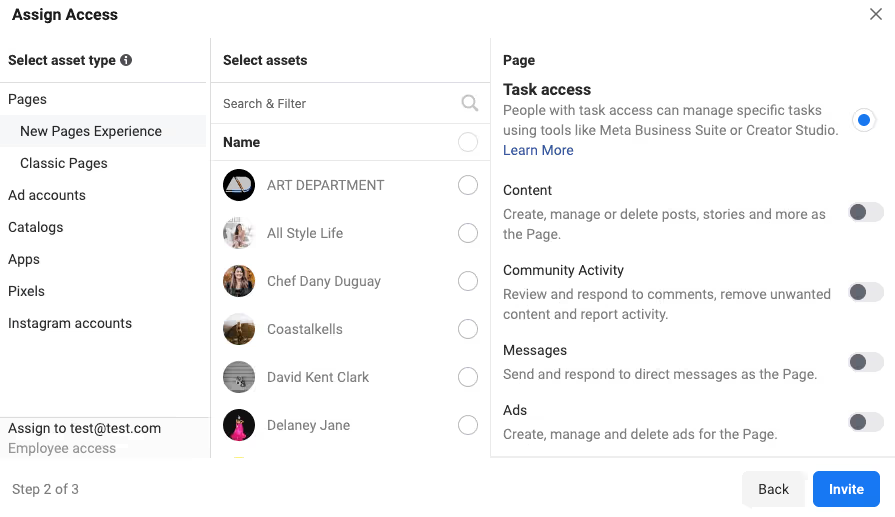
The next screen is where you pick what assets this person will have access to. It’s crucial that you pay close attention to the asset types on the left, and select the appropriate Facebook pages and Instagram accounts in the middle section that the access applies to.
You can also tweak specific permission under the right-hand column. Be sure to look over all options if you have unique parameters for this person, or assign them Full control if you’d like them to have more freedom. Go ahead and click Invite. Let anyone who you invited know to check their emails to accept the invite.
Now that you’ve added your team, you’re all set! Congratulations — give yourself another pat on the back for setting up your Meta Business Manager. You’re ready to get started and launch your first Ad Campaign!

